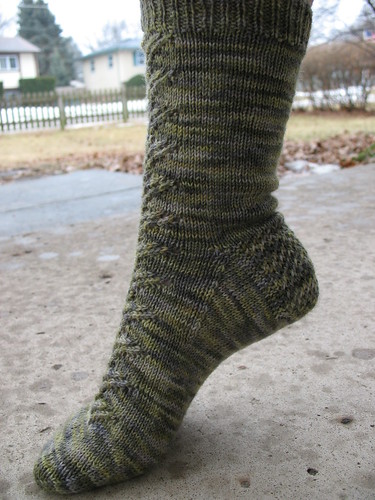
Devil’s Snare Socks
By Erica Lueder
Materials
Yarn: Fingering Weight – approx 375-400yds. Sample sock knit with Araucania Ranco Solid.
Needles: US 2 (2.75mm) – set of 2 Circular Needles, or size needed to obtain gauge.
Gauge: 32sts per 4 inches (10cm)
A Few Notes on This Pattern
- This sock is constructed with a panel of Stockinette sts on either side of the main lace panel. To adjust for size, add or subtract evenly from both Stockinette panels flanking the lace panel or go down a needle size.
- The heel flap is knit on an uneven number of sts. Please pay attention to the numbers provided in the pattern. There is not a good place to divide the lace panel for the gusset; one or two sts will have to be switched occasionally from ndl 1 to ndl 2 and vice versa in order to complete the established lace pattern.
- If one prefers a short row heel, simply disregard instructions for the heel flap, substitute a short row heel using ndl 2 and continue the rest of the instep in pattern.
- If dpns are preferred, place 31 instep sts on ndl 1 and divide the remaining 31 sts between ndl 2 and ndl 3. If needed, the side panel St St sts could be added to ndls 2 and 3 as well. The heel flap, heel turn, and gussets are knit using ndls 2 and 3 while ndl 1 carries the instep sts.
Slightly Modified Garter-Stitch Edged Eye of Partridge Heel
Row 1: k3, p to end
Row 2: p3, *k1, sl 1* to last 4 sts, k4
Row 3: k3, p to end
Row 4: p3, *sl 1, K1* to last 4 sts, sl 1, k3
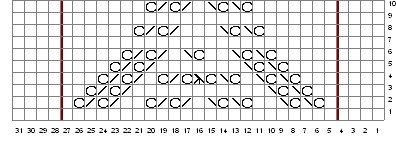
Devil’s Snare Lace Panel
INSTRUCTIONS:
Cuff
CO 62 sts, divide evenly over 2 circular needles (31 sts each needle). Join for knitting in the round.
Work 15 rows of ribbing: *k1p1*.
Knit 1 row before starting the lace pattern.
Leg
Begin Devil’s Snare Lace Pattern along needle 1 only. The back of the sock (sts on needle 2) is knit in St St. Continue knitting lace pattern for a total of 6 pattern repeats or until you have reached your desired length ending with row 10 of pattern.
Heel Flap
The heel is worked using needle 2. Knit the Slightly Modified Garter-Stitch Edged Eye of Partridge Heel Pattern for a total of 9 pattern repeats (36 total rows) ending with Row 4 of the pattern. This leaves 18 garter rows for pick up after the heel is turned.
Heel Turn
With WS facing you,
Sl 1, p 16, p2tog, p1, turn
Next row: sl 1, k4, ssk, k1, turn
Next row: sl 1, p5, p2tog, p1, turn
Next row: sl 1, k6, ssk, k1, turn
Next row: sl 1, p7, p2tog, p1, turn
Next row: sl 1, k8, ssk, k1, turn
**continue in this manner until all sts are accounted for – there should be 17 heel sts left on the needle at this point.**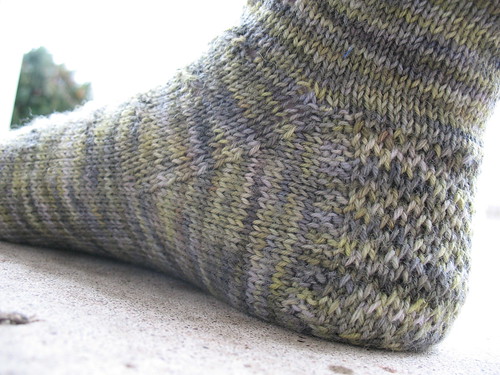
Pick up the heel flap sts.
Using the ndl holding the heel sts (now referred to as ndl 1): pu 18 sts along the heel flap, pu 1 extra st between the heel flap and the instep (to close the gap), pm, k across 15 instep sts in pattern. Switch to the other needle (now referred to as ndl 2).
Using ndl 2: continue across second half of the instep sts (16 sts) in pattern, pm, pu 1 extra st between instep and heel flap (to close gap), pu 18 heel flap sts, continue to knit across 8 heel sts.
**at this point there should be 43 sts on ndl 1 (15 instep sts, 28 flap/heel sts) and 43 sts on ndl 2 (16 instep sts, 27 flap/heel sts)**
Gusset
Set up Row:
Ndl 1: k across the heel and heel flap sts until you reach 2 sts before the marker, ssk, sm, continue to knit across the instep sts in pattern.
Ndl 2: k across the instep sts in pattern, sm, k2tog, k to end
Now we’re ready to get going on the gusset J
Row 1: Ndl 1: k to 3 sts before marker, k2tog, k1, sm, knit instep sts in pattern
Ndl 2: k across instep sts in pattern, sm, k1, ssk, k to end
Row 2: Ndl 1: K to marker, sm, continue across instep sts in pattern
Ndl 2: k across instep sts in pattern, sm, k to end
**Repeat these 2 rows until there are 16 sole sts left on ndl 1 and 15 sole sts on ndl 2 (21 gusset rows total, not including the set-up row)**
Redistribute the sts so ndl 1 carries the instep sts and ndl 2 carries the sole sts.
Instep
Continue knitting in pattern (ndl 1: the Devil’s Snare Lace Pattern, ndl 2: St St) until you have reached your desired length (leave approximately 2 inches for the toe) ending with row 10 of the Devil’s Snare Lace Pattern.
Toe
Toe Shaping
Decrease rounds are knit as follows:
*k1, ssk, k to last 3 sts, k2tog, k1*
Row 1: decrease (29 sts per ndl)
Row 2 & 3: knit
Row 4: decrease (27 sts per ndl)
Row 5 & 6: knit
Row 7: decrease (25 sts per ndl)
Row 8 & 9: knit
Row 10: decrease (23 sts per ndl)
Row 11: knit
Row 12: decrease (21 sts per ndl)
Row 13: knit
Row 14: decrease (19 sts per ndl)
Row 15: knit
Row 16: decrease (17 sts per ndl)
Row 17: decrease (15 sts per ndl)
Row 18: decrease (13 sts per ndl)
Row 19: decrease (11 sts per ndl)
Finishing
Cut yarn leaving a 10 inch tail and weave through remaining sts using the 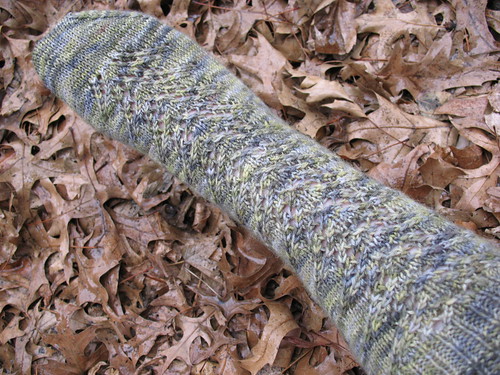
CO: cast on
k: knit
k2tog: knit 2 stitches together
ndl: needle
p: purl
pm: place marker
pu: pick up
sl 1: slip one stitch as if to purl **keep yarn in back unless mentioned otherwise**
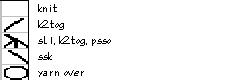
sl1, k2tog, psso: slip one st as if to purl, k2tog, pass slipped stitch over
sm: slip marker
ssk: slip 1 st as if to knit, slip 1 st as if to knit, knit (decrease)
St St: Stockinette Stitch
sts: stitches
WS: wrong side
YO: yarn over
Inspiration:
I loved the description of Devil’s Snare in J.K. Rowling’s Harry Potter Series, and was inspired by the unusual way that the plant snakes itself around things. For this sock pattern, I wanted to incorporate a simple lace pattern working its way up the wearer’s legs like the plant itself would.
3 comments:
I think this is a beautiful pattern. I can't wait to knit it. Thanks for sharing.
This looks like such a fun pattern, I can't wait to knit it!
These are gorgeous and I am casting on for them today! Thanks for all of the free patterns!
Post a Comment