Showing posts with label Free Sock Pattern. Show all posts

Wednesday, September 09, 2009

The Weasley Rib

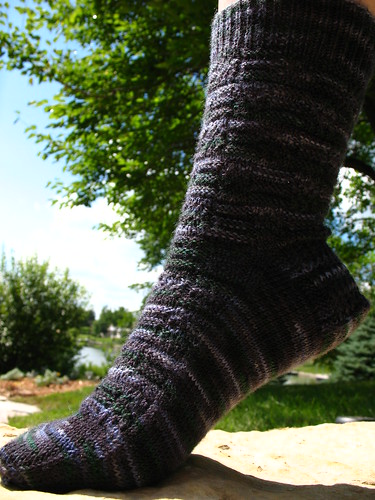
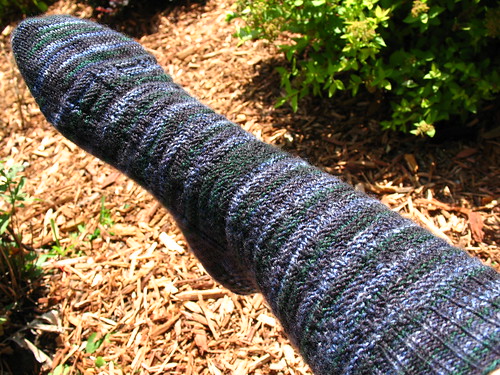
The Weasley Rib - A Sock Pattern
by Erica Lueder

Materials


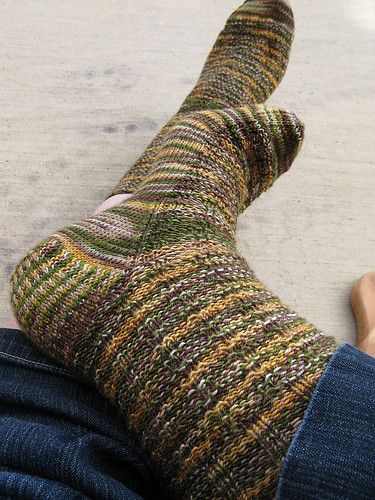
Yarn: Fingering Weight - approx 350-400yds. Sample sock knit with Socks that Rock Lightweight in the Harlotty Colorway.


Needles: US 1 (2.25mm) – set of 2 Circular Needles, or size needed to obtain gauge.


Gauge: 36 sts per 4 inches (10cm)


INSTRUCTIONS:


Cuff


CO 60 sts, divide evenly over 2 circular needles (30 sts each needle). Join for knitting in the round.


Work 20 rows of ribbing: *p2, k2, p1*


Leg


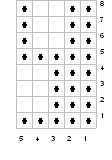
Begin the Wronky Rib Pattern for a total of 9 pattern repeats or until you have reached your desired length ending with row 4 or 8 of pattern.


Wronky Rib Pattern

(Repeat from * to *)

Row 1: purl

Rows 2-4: *p3, k2*

Row 5: purl

Row 6-8: *p2, k2, p1*



Heel Flap


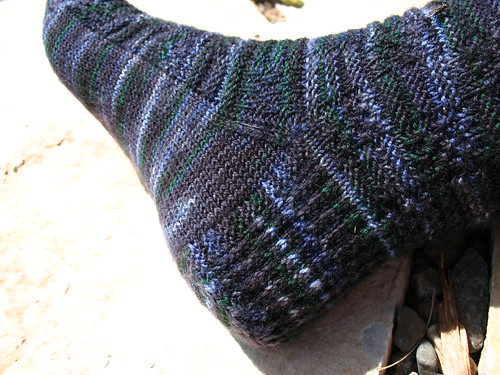
The heel flap is worked using ndl 2; ndl 1is holding the instep sts. Knit the Garter and Slip Stitch Heel Pattern (36 total rows). This leaves 18 edge sts for pick up after the heel is turned.


Garter and Slip Stitch Heel

Row 1 (and all odd rows): k3, p to end

Rows 2,4,6,8,10,12: p3, *k1, sl 1* to last 3 sts, k3

Rows 14,16,18,20,22,24: p3, *sl 1, k1* to last 3 sts, k3

Rows 26,28,30,32,34,36: p3, *k1, sl 1* to last 3 sts, k3


Heel Turn


With WS facing you,

Sl 1, p 15, p2tog, p1, turn

Next row: sl 1, k3, ssk, k1, turn

Next row: sl 1, p4, p2tog, p1, turn

Next row: sl 1, k5, ssk, k1, turn

Next row: sl 1, p6, p2tog, p1, turn

Next row: sl 1, k7, ssk, k1, turn


**continue in this manner until all sts are have been knit – there should be 16 heel sts left on the needle at this point.**


Pick up (pu) the heel flap sts.
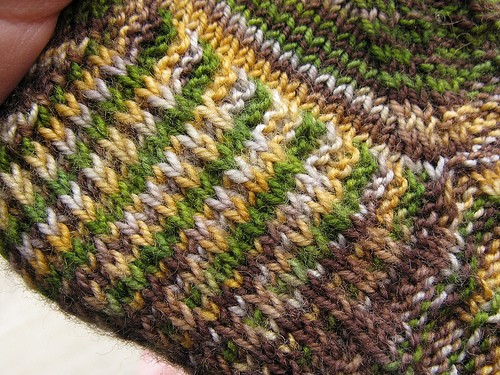

Using the ndl holding the heel sts (now referred to as ndl 1): pu 18 sts along the heel flap, pu 1 extra st between the heel flap and the instep (to close the gap), pm, k across half of the instep sts (15 sts) in pattern. Switch to the other needle (now referred to as ndl 2).


Using ndl 2: continue across second half of the instep sts (15 sts) in pattern, pm, pu 1 extra st between instep and heel flap (to close gap), pu 18 heel flap sts, continue to knit across half of the heel sts (8 sts)


**at this point there should be 42 sts on each needle**


Gusset


Set up row:


Ndl 1: k across the heel and heel flap sts until you reach 2 sts before the marker, ssk, sm, continue to knit across the instep sts in pattern.


Ndl 2: k across the instep sts in pattern, sm, k2tog, k to end


Now we’re ready to get going on the gusset


Row 1: Ndl 1: k to 3 sts before marker, k2tog, k1, sm, knit instep sts in pattern

Ndl 2: k across instep sts in pattern, sm, k1, ssk, k to end


Row 2: Ndl 1: K to marker, sm, continue across instep sts in pattern

Ndl 2: k across instep sts in pattern, sm, k to end


**Repeat these 2 rows until there are 30 sts left on each needle (21 gusset rows total, not including the set-up row)**


Redistribute the sts so ndl 1 carries the instep sts and ndl 2 carries the sole sts.


Instep


Continue knitting in pattern (ndl 1: the Wronky Rib Pattern, ndl 2: St st) until you have reached your desired length ending with row 1 or 5 of the Wronky Rib Pattern.


Toe


Decrease rounds are knit as follows:

*k1, ssk, k to last 3 sts, k2tog, k1*

Row 1: decrease (28 sts per ndl)
Row 2: knit

Row 3: decrease (26 sts per ndl)

Row 4: knit

Row 5: decrease (24 sts per ndl)

Row 6: knit

Row 7: decrease (22 sts per ndl)

Row 8: knit

Row 9: decrease (20 sts per ndl)

Row 10: knit

Row 11: decrease (18 sts per ndl)

Row 12: knit

Row 13: decrease (16 sts per ndl)

Row 14: knit

Row 15: decrease (14 sts per ndl)

Row 16: decrease (12 sts per ndl)

Row 17: decrease (10 sts per ndl)


Finishing


Cut yarn leaving a 10 inch tail and weave through remaining sts using the Kitchener technique. Weave in all ends and congratulate yourself on knitting a beautiful sock. Now knit the other one if you haven’t already.


Abbreviations:

CO: cast on

k: knit

k2tog: knit 2 stitches together

ndl: needle

p: purl

p2tog: purl 2 stitches together

pm: place marker

pu: pick up

sl 1: slip one stitch as if to purl

ssk: slip, slip, knit

St st: Stockinette Stitch

sts: stitches


Inspiration:


There are so many things to love and enjoy about the Weasley Family as described in J.K. Rowling’s Harry Potter Series. One of the things that I like best is the way they adapt what they have to best suit their needs. Their home is a perfect example of this - when more room is needed, build up and don’t worry about keeping all the lines straight and tidy!


NOTE: Sample sock was test knit by the lovely Bea Binney (yarnpig on Ravelry). All photos shown in pattern were taken by her. Thanks Bea!

Thursday, July 16, 2009

Hidden Stairways

Hidden Stairways Socks
by Erica Lueder

Materials


Yarn: Fingering Weight - approx 350-400yds. Sample sock knit with Bernat Baby Jacquards. Note: Sample sock and photographs appear courtesy of Valerie (Vallieskids on Ravelry).


Needles: US 1 (2.25mm) – set of 2 Circular Needles, or size needed to obtain gauge.


Gauge: 36 sts per 4 inches (10cm)


Stairway Pattern

(Repeat from * to *)

Rows 1-2: *p2, k6*

Rows 3-4: *k1, p2, k5*

Rows 5-6: *k2, p2, k4*

Rows 7: *k3, p2, k3*

Row 8: purl

Row 9-10: *k6, p2*

Rows 11-12: K5, p2, k1*

Rows 13-14: *k4, p2, k2*

Row 15: *k3, p2, k3*

Row 16: purl


Slightly Modified Garter-Stitch Edged Eye of Partridge Heel

Row 1: k3, p to end

Row 2: p3, *k1, sl 1* to last 3 sts, k3

Row 3: k3, p to end

Row 4: p3, *sl 1, K1* to last 3 sts, k3


INSTRUCTIONS:


Cuff


CO 64 sts, divide evenly over 2 circular needles (32 sts each needle). Join for knitting in the round.

Work 20 rows of ribbing: *k1, p1*


Leg


Knit 1 row. Begin the Stairway Pattern for a total of 4 pattern repeats or until you have reached your desired length ending with row 8 or 16 of pattern.


Heel Flap


The heel flap is worked using ndl 2; ndl 1 is holding the instep sts. Knit the Slightly Modified Garter-Stitch Edged Eye of Partridge Heel Pattern for a total of 8 pattern repeats (32 total rows) ending with Row 4 of the pattern. This leaves 16 edge sts for pick up after the heel is turned.


Heel Turn


With WS facing you,

Sl 1, p 16, p2tog, p1, turn

Next row: sl 1, k3, ssk, k1, turn

Next row: sl 1, p4, p2tog, p1, turn

Next row: sl 1, k5, ssk, k1, turn

Next row: sl 1, p6, p2tog, p1, turn

Next row: sl 1, k7, ssk, k1, turn


**continue in this manner until all sts are have been knit – there should be 18 heel sts left on the needle at this point.**


Pick up (pu) the heel flap sts.


Using the ndl holding the heel sts (now referred to as ndl 1): pu 16 sts along the heel flap, pu 1 extra st between the heel flap and the instep (to close the gap), pm, k across half of the instep sts (16 sts) in pattern. Switch to the other needle (now referred to as ndl 2).


Using ndl 2: continue across second half of the instep sts (16 sts) in pattern, pm, pu 1 extra st between instep and heel flap (to close gap), pu 16 heel flap sts, continue to knit across half of the heel sts (9 sts)


**at this point there should be 42 sts on each needle**


Gusset


Set up row:


Ndl 1: k across the heel and heel flap sts until you reach 2 sts before the marker, ssk, sm, continue to knit across the instep sts in pattern.

Ndl 2: k across the instep sts in pattern, sm, k2tog, k to end

Now we’re ready to get going on the gusset.

Row 1: Ndl 1: k to 3 sts before marker, k2tog, k1, sm, knit instep sts in pattern. Ndl 2: k across instep sts in pattern, sm, k1, ssk, k to end


Row 2: Ndl 1: K to marker, sm, continue across instep sts in pattern. Ndl 2: k across instep sts in pattern, sm, k to end


**Repeat these 2 rows until there are 32 sts left on each needle (17 gusset rows total, not including the set-up row)**


Redistribute the sts so ndl 1 carries the instep sts and ndl 2 carries the sole sts.


Instep


Continue knitting in pattern (ndl 1: the Stairways Pattern, ndl 2: St st) until you have reached your desired length ending with row 8 or 16 of the Stairways Pattern.


Toe


Decrease rounds are knit as follows: *k1, ssk, k to last 3 sts, k2tog, k1*

Row 1: decrease (30 sts per ndl)

Row 2 & 3: knit

Row 4: decrease (28 sts per ndl)

Row 5 & 6: knit

Row 7: decrease (26 sts per ndl)

Row 8 & 9: knit

Row 10: decrease (24 sts per ndl)

Row 11: knit

Row 12: decrease (22 sts per ndl)

Row 13: knit

Row 14: decrease (20 sts per ndl)

Row 15: knit

Row 16: decrease (18 sts per ndl)

Row 17: decrease (16 sts per ndl)

Row 18: decrease (14 sts per ndl)

Row 19: decrease (12 sts per ndl)


Finishing


Cut yarn leaving a 10 inch tail and weave through remaining sts using the Kitchener technique. Weave in all ends and congratulate yourself on knitting a beautiful sock. Now knit the other one if you haven’t already.


Abbreviations:

CO: cast on

k: knit

k2tog: knit 2 stitches together

ndl: needle

p: purl

p2tog: purl 2 stitches together

pm: place marker

pu: pick up

sl 1: slip one stitch as if to purl

ssk: slip, slip, knit

St st: Stockinette Stitch

sts: stitches


Inspiration:

Hogwarts is such an incredible castle and I love reading all about the twisting and turning stairways and corridors in J.K. Rowling’s Harry Potter Series. These socks are a tribute to those who seek to learn the many secrets and secret places held within Hogwarts’ walls.

Monday, July 13, 2009

Snape's Stockings

Snape’s Stockings

By Erica Lueder


Materials:


Yarn: Fingering Weight - approx 350-400yds. Sample socks knit with Garnstudio DROPS Fabel 905 Colorway and Sunshine Yarn’s Twist Sock Yarn in the Snape Colorway.


Needles: US 1 (2.25mm) – set of 2 Circular Needles, or size needed to obtain gauge.


Gauge: 40 sts per 4 inches (10cm)


Garter and Slip Stitch Heel

Row 1 (and all odd rows): k3, p to end

Rows 2,4,6,8,10,12: p3, *k1, sl 1* to last 3 sts, k3

Rows 14,16,18,20,22,24: p3, *sl 1, k1* to last

3 sts, k3

Rows 26,28,30,32,34,36: p3, *k1, sl 1* to last

3 sts, k3


INSTRUCTIONS:


Cuff


CO 72 sts, divide evenly over 2 circular needles (36 sts each needle). Join for knitting in the round.


Work 20 rows of ribbing: *k1,p1*


Leg


Knit 1 row. Begin the main leg pattern (see chart below) for a total of 3 pattern repeats or until you have reache d your desired length ending with row 11 or 23 of pattern.


Heel Flap


The heel flap is worked using ndl 2; ndl 1 is hold

ing the instep sts. Knit the Garter and Slip

Stitch Heel Pattern for a total of 9 pattern repeats (36

total rows). This lea

ves 18 edge sts for pick up after the heel is turned.


Heel Turn


Instructions for substituting a Dutch heel/gusset (if one so chooses) appears immediately after the following heel turn/gusset instructions.


With WS facing you,

Sl 1, p 18, p2tog, p1, turn

Next row: sl 1, k3, ssk, k1, turn

Next row: sl 1, p4, p2tog, p1,

turn

Next row: sl 1, k5, ssk, k1, turn

Next row: sl 1, p6, p2tog, p1, turn

Next row: sl 1, k7, ssk, k1, turn


**continue in this manner until all sts are have been knit – there should be 20 heel sts left on the needle at this point.**


Pick up (pu) the heel flap sts.


Using the ndl holding the heel sts (now referred to as ndl 1): pu 18 sts

along the heel flap, pu 1 extra st between the heel flap and the instep (to close the gap), pm, k across half of the instep sts (18 sts) in

pattern. Switch to the other needle (now referred to as ndl 2).

Using ndl 2: continue across second half of the instep sts (18 sts) in pattern, pm, pu 1 extra st

between instep and heel flap (to close gap), pu 18 heel flap sts, continue to knit across half of the heel sts (10 sts)


**at this point there should be 47 sts on each needle**


Gusset


Set up row:


Ndl 1: k across the heel and heel flap sts until you reach 2 sts before the marker, ssk, sm,

continue to knit across the instep sts in pattern.

Ndl 2: k across the instep sts in pattern, sm, k2tog, k to end

Now we’re ready to get going on the gusset.


Row 1: Ndl 1: k to 3 sts before marker, k2tog,

k1, sm, knit instep sts in pattern. Ndl 2: k across instep sts in pattern, sm, k1, ssk, k to end


Row 2: Ndl 1: K to marker, sm, continue across instep sts in

pattern. Ndl 2: k across instep sts in pattern, sm, k to end


**Repeat these 2 rows until there are 36 sts left on each

needle (21 gusset rows total, not including the set-up row)**

Redistribute the sts so ndl 1 carries the instep sts and ndl 2

carries the sole sts.


Heel Turn – Dutch Heel Instructions


With WS facing you,

Sl 1, p 22, p2tog, turn

Next row: sl 1, k10, ssk, turn

Next row: sl 1, purl to 1 st before gap, p2tog, turn

Next row: sl 1, knit to 1 st before gap ssk, turn


**continue in this manner until all sts are have been knit – there should be 12 heel sts left on the needle at this point.**


Pick up (pu) the heel flap sts.


Using the ndl holding the heel sts (now referred to as ndl 1): pu 18 sts along the heel flap, pu 1 extra st between the heel flap and the instep (to close the gap), pm, k across half of the instep sts (18 sts) in pattern. Switch to the other needle (now referred to as ndl 2).


Using ndl 2: continue across second half of the instep sts (18 sts) in pattern, pm, pu 1 extra st between instep and heel flap (to close gap), pu 18 heel flap sts, continue to knit across half of the heel sts (6 sts)


**at this point there should be 43 sts on each needle**


Gusset


Set up row:

Ndl 1: k across the heel and heel flap sts until you reach 2 sts before the marker, ssk, sm, continue to knit across the instep sts in pattern.

Ndl 2: k across the instep sts in pattern, sm, k2tog, k to end


Now we’re ready to get going on the gusset.


Row 1: Ndl 1: k to 3 sts before marker, k2tog, k1, sm, knit instep sts in pattern. Ndl 2: k across instep sts in pattern, sm, k1, ssk, k to end

Row 2: Ndl 1: K to marker, sm, continue across instep sts in pattern. Ndl 2: k across instep sts in pattern, sm, k to end


**Repeat these 2 rows until there are 36 sts left on each needle (11 gusset rows total, not including the set-up row)**


Redistribute the sts so ndl 1 carries the instep sts and ndl 2 carries the sole sts.


Instep


Continue knitting in pattern (ndl 1: the main leg pattern, ndl 2: St st) until you

have reached your desired length ending with row 12 or 24 of the main leg pattern.


Toe

Decrease rounds are knit as follows: *k1, ssk, k to last 3 sts, k2tog, k1*

Row 1: decrease (34 sts per ndl)

Row 2 & 3: knit

Row 4: decrease (32 sts per ndl)

Row 5 & 6: knit

Row 7: decrease (30 sts per ndl)

Row 8 & 9: knit

Row 10: decrease (28 sts per ndl)

Row 11: knit

Row 12: decrease (26 sts per ndl)

Row 13: knit

Row 14: decrease (24 sts per ndl)

Row 15: knit

Row 16: decrease (22 sts per ndl)

Row 17: knit

Row 18: decrease (20 sts per ndl)

Row 19: knit

Row 20: decrease (18 sts per ndl)

Row 21: decrease (16 sts per ndl)

Row 22: decrease (14 sts per ndl)

Row 23: decrease (12 sts per ndl)


Finishing


Cut yarn leaving

a 10 inch tail and weave

through remaining sts using the Kitchener technique. Weave in all ends and congratulate

yourself on

knitting a beautiful

sock. Now knit the other one if you haven’t already.


Abbreviations:

CO: cast on

k: knit

k2tog: knit 2 stitches together

ndl: needle

p: purl

p2tog: purl 2 stitches together

pm: place marker

pu: pick up

sl 1: slip one stitch as if to purl

ssk: slip, slip, knit

St st: Stockinette Stitch

sts: stitches


Inspiration:

Severus Snape is an often disliked and more often misunderstood character from J.K. Rowling’s Harry Potter Series. Snape, as he is often simply referred to, is a very complex character that is woven into every facet of the story – both the good and the bad. This particular stitch pattern reminded me of the competing sides that Snape glides through effortlessly while at the same time, complimenting each other and creating a depth of fabric.

Note: Above photo was taken by Anna (Absinthia on Ravelry).